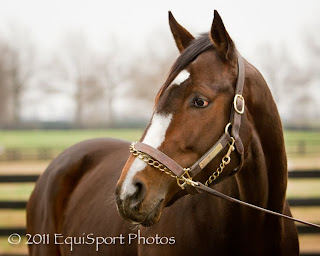
She was poised and perfect. The weather was cold and crappy... and there was a crowd.
So. How can we make some good pictures?
Follow me...
 |
| Rachel Alexandra. Photo: Matt Wooley/EquiSport Photos 1/640 @ f/3.5, iso 800, -1 1/3 EV, 125mm, cloudy white balance. |
Just so you have a point of reference, here is the scene.
First thing is to evaluate the scene with your eyes. It's dark, and there are lots of people. So I'm going to shoot tight, that will help lose the people.
Second thing, I'm going to shoot pretty wide open in Aperture Priority (f/3.5), to bring in light and control the depth of field. I raise the ISO to about 800.
Last thing, lower the Exposure Value. I want to keep it dark and moody. I don't want to blow out the highlights.
Remember, I am the "Protector of Highlights". We talked about EV in the last post.
I have one lens with me, a 70-200 f/2.8, and I shot 305 images in about 35 minutes. I ended up with a dozen that worked, and 4 that I really like.
That's half the job. What's the next step? What do I need to do to get Rachel, in all of her glory, up on the website?
Let's run through a quick Lightroom demo. Lightroom Rocks!
Elements and Photoshop used to be the "go to" editing software for me, but I am now in Lightroom 90% of the time. Lightroom 3 to be specific.
 |
| Rachel Alexandra. Photo: Matt Wooley/EquiSport Photos 1/400 @ f/3.5, iso 800, -1/3 EV, 200mm, cloudy white balance. |
Here's the Lightroom screen shot with the original image.
I have turned on the blown highlights, as shown in red. This it what you might see on your camera LCD with the "highlight alerts", or blinkies, turned on. As I said in the last post, I like to push the exposure, knowing that I can recover the highlights in Lightroom. With my in camera EV set at -1/3, I captured the detail in the shadow, without blowing out too much. So, -1/3 was actually "pushing the exposure".
I just start at the top of the Develop Panel on the right side of the screen.
Crop in a little tighter to lose the nose chain.
Raise the Color Temperature to add warmth, 7000 for this shot.
Move the Recovery slider to about 40 to recover the highlights.
Add some Blacks for contrast (to maybe 15), add Brightness (65 or so).
Next, I'm going to grab the adjustment brush, and add a little exposure and brightness to the face (+33 exp, +7 brightness on the brush). This is a "Selective" exposure change.
I actually made a correct exposure in the camera, so I don't need a "Global" modification with the Exposure slider.
Going right down the Develop Panel;
Add a little Sharpness (40), add some Noise Reduction (20) and Color Noise Reduction (40).
Finally, a nice dark Vignette (-20).
Here's the Before/After screen. I did not have to add any Clarity, Vibrance or Saturation to this image. By exposing properly in camera, I just needed to add some contrast, with the Blacks and Brightness sliders. Moving the Color Temperature to 7000 gave me all the color I needed.
This image could live right here just fine, a nice rich color picture. But I wanted to give it a classic look, so I added a Sepia Tone. First by clicking B&W in the HSL Panel, then adjusting the Split Toning. My recipe for this shot was, Highlights Hue and Saturation 40 & 30, Shadows Hue & Saturation 40 & 30.
Okay, that's a quick run-through with Lightroom. The whole process took about a minute. I then export as a JPG and it's ready to send out. Did I mention that Lightroom Rocks!
The image on the left ran in the Thoroughbred Times Today for Saturday, March 25th. I sent 4 different images, and this is what the editors selected.
As you can see, from a photojournalism standpoint, it's good to include the entire scene to give context. But it's the artsy head shots that made it to my website.
The lesson here is figuring out how to make a nice picture given a difficult situation. Some of my favorite shots were taken in real pain in the ass conditions, like in the pouring rain during an important race. That's what connects with the viewer and gives the image it's mood.

A quick reminder..
We are looking for a few more Camera Happy Participants for our Spring Equine Photography Workshop, May 3-5, which includes working in Lightroom!
Space in the workshop is limited to 12 or so!
The cutoff date for our discounted room rate is April 2nd.
That's it for now... mw.


Looks like a great piece of software, I'm just a hobby photographer but I know how hard it can be to get decent pictures in that kind of weather. This makes me I wish I had a copy of Lightroom to play around with.
ReplyDeleteAs a Rachel fan I must say I would kill for a desktop size version of that first one. =) Will the rest of the set be uploaded anywhere?
Thanks Nick. Lightroom is a great piece of software for photo editing. It really speeds up the process, especially when you have say, 305 to sort through, and have to beat a deadline.
ReplyDeleteSend me your email address, and I'll send you that Rachel for your wallpaper... equisportphotos@gmail.com
Be sure to check out our sister site for more cool photo tips: Capture The Light Equine